Approaches Overview
Instrument Approach Procedure
A series of predetermined maneuvers for the orderly transfer of an aircraft operating under instrument flight rules from the beginning of the initial approach to a landing, or to a point from which a landing may be made visually.
- There are three main types of instrument approach procedures (IAP)
- Non-Precision Approach (NPA)
- No vertical guidance
- Examples: VOR, TACAN, LNAV, NDB, LOC, and ASR
- Precision Approach (PA)
- Has vertical guidance meeting ICAO standards
- Examples: PAR, ILS, and GLS
- Approach with Vertical Guidance (APV)
- Provides course and glidepath deviation information but not to ICAO standards (Annex 10)
- Examples: Baro-VNAV, LDA with glidepath, LNAV/VNAV and LPV
- Non-Precision Approach (NPA)
- Additionally there are
- Circling Approaches
- Visual Approach
- Is not an instrument approach procedure (IAP)
- Contact Approach
- Similar to a visual approach, but with lower visibility minimums
- Approaches that do not have straight-in landing minimums are identified by the type of approach followed by a letter.
- Find Standard Instrument Approach Procedure Charts in the Digital Terminal Procedures Publication
- Updated every 28 days
- Approach Gate
- The approach gate is an imaginary point used within ATC as a basis for vectoring aircraft to the final approach course.
- The gate is established along the final approach course one mile from the FAF on the side away from the airport and is no closer than 5 NM from the landing threshold.
Aircraft Approach Categories
- Approach categories are defined in 14 CFR §97.3 Symbols and terms used in procedures
- Aircraft approach category means a grouping of aircraft based on a reference landing speed (
), if specified, or if is not specified, 1.3 at the maximum certified landing weight. - Approach categories define the minima used for a given approach
- Aircraft category also impacts circling radius
- See the following category limits noting that the airspeeds depicted are indicated airspeeds (IAS):
- Category A: Speed less than 91 knots.
- Category B: Speed 91 knots or more but less than 121 knots.
- Category C: Speed 121 knots or more but less than 141 knots.
- Category D: Speed 141 knots or more but less than 166 knots.
- Category E: Speed 166 knots or more.
- An airplane is certified in only one approach category, and although a faster approach may require higher category minimums to be used, an airplane cannot be flown to the minimums of a slower approach category.
- Cessna 172 is Category A
Altitudes
- Minimum Descent Altitude (MDA)
- The lowest altitude, expressed in feet MSL, to which descent is authorized on final approach or during circle-to-land maneuvering in execution of a standard instrument approach procedure (SIAP) where no electronic glideslope is provided.
- Decision Altitude (DA)
- Specified altitude in the precision approach at which the decision to continue or execute the missed approach must be initiated if the required visual reference to continue the approach has not been established.
- Decision Height (DH)
- With respect to the operation of aircraft, means the height at which a decision must be made during an ILS, MLS, or PAR IAP to either continue the approach or to execute a missed approach.
- Minimum Safe Altitude (MSA)
- Provided on approach charts for emergency use
- Provide 1,000' of obstacle clearance
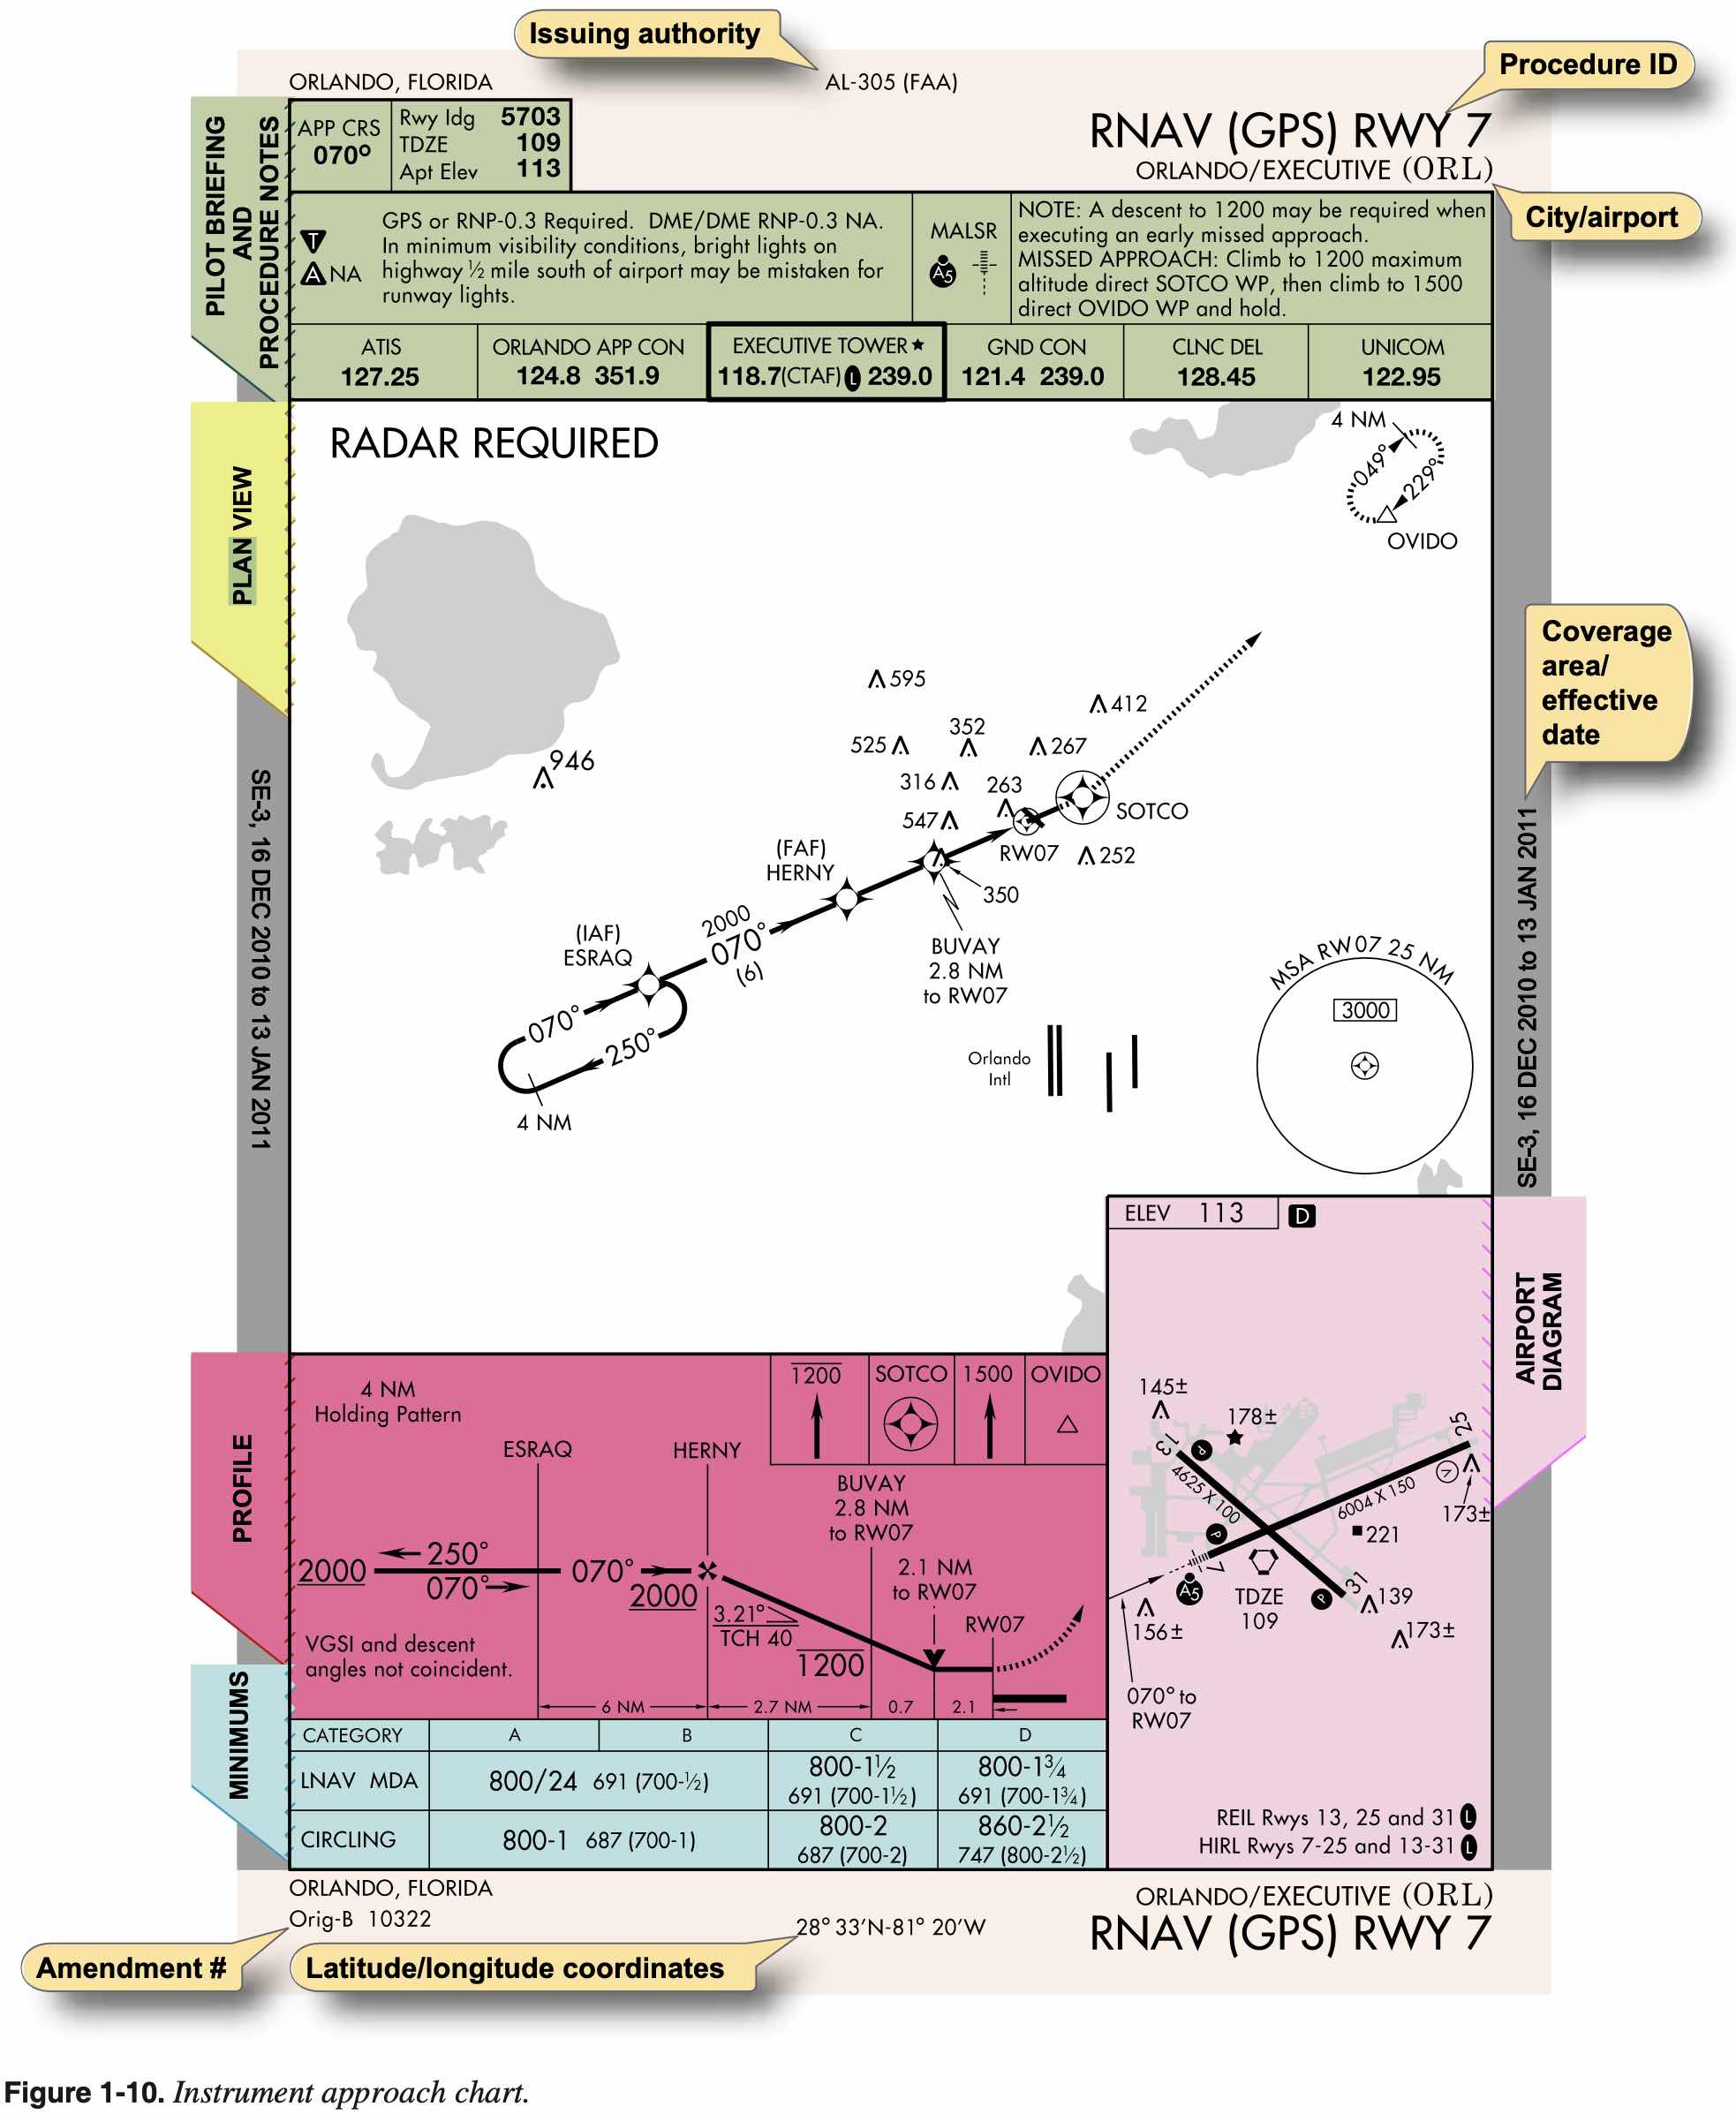
Chart Overview
TIP
Know how to read an instrument approach chart, review charts before flight, and make sure to have the charts during flight.
- Components of approach chart
- Margins
- Briefing strip and procedure notes
- Plan view
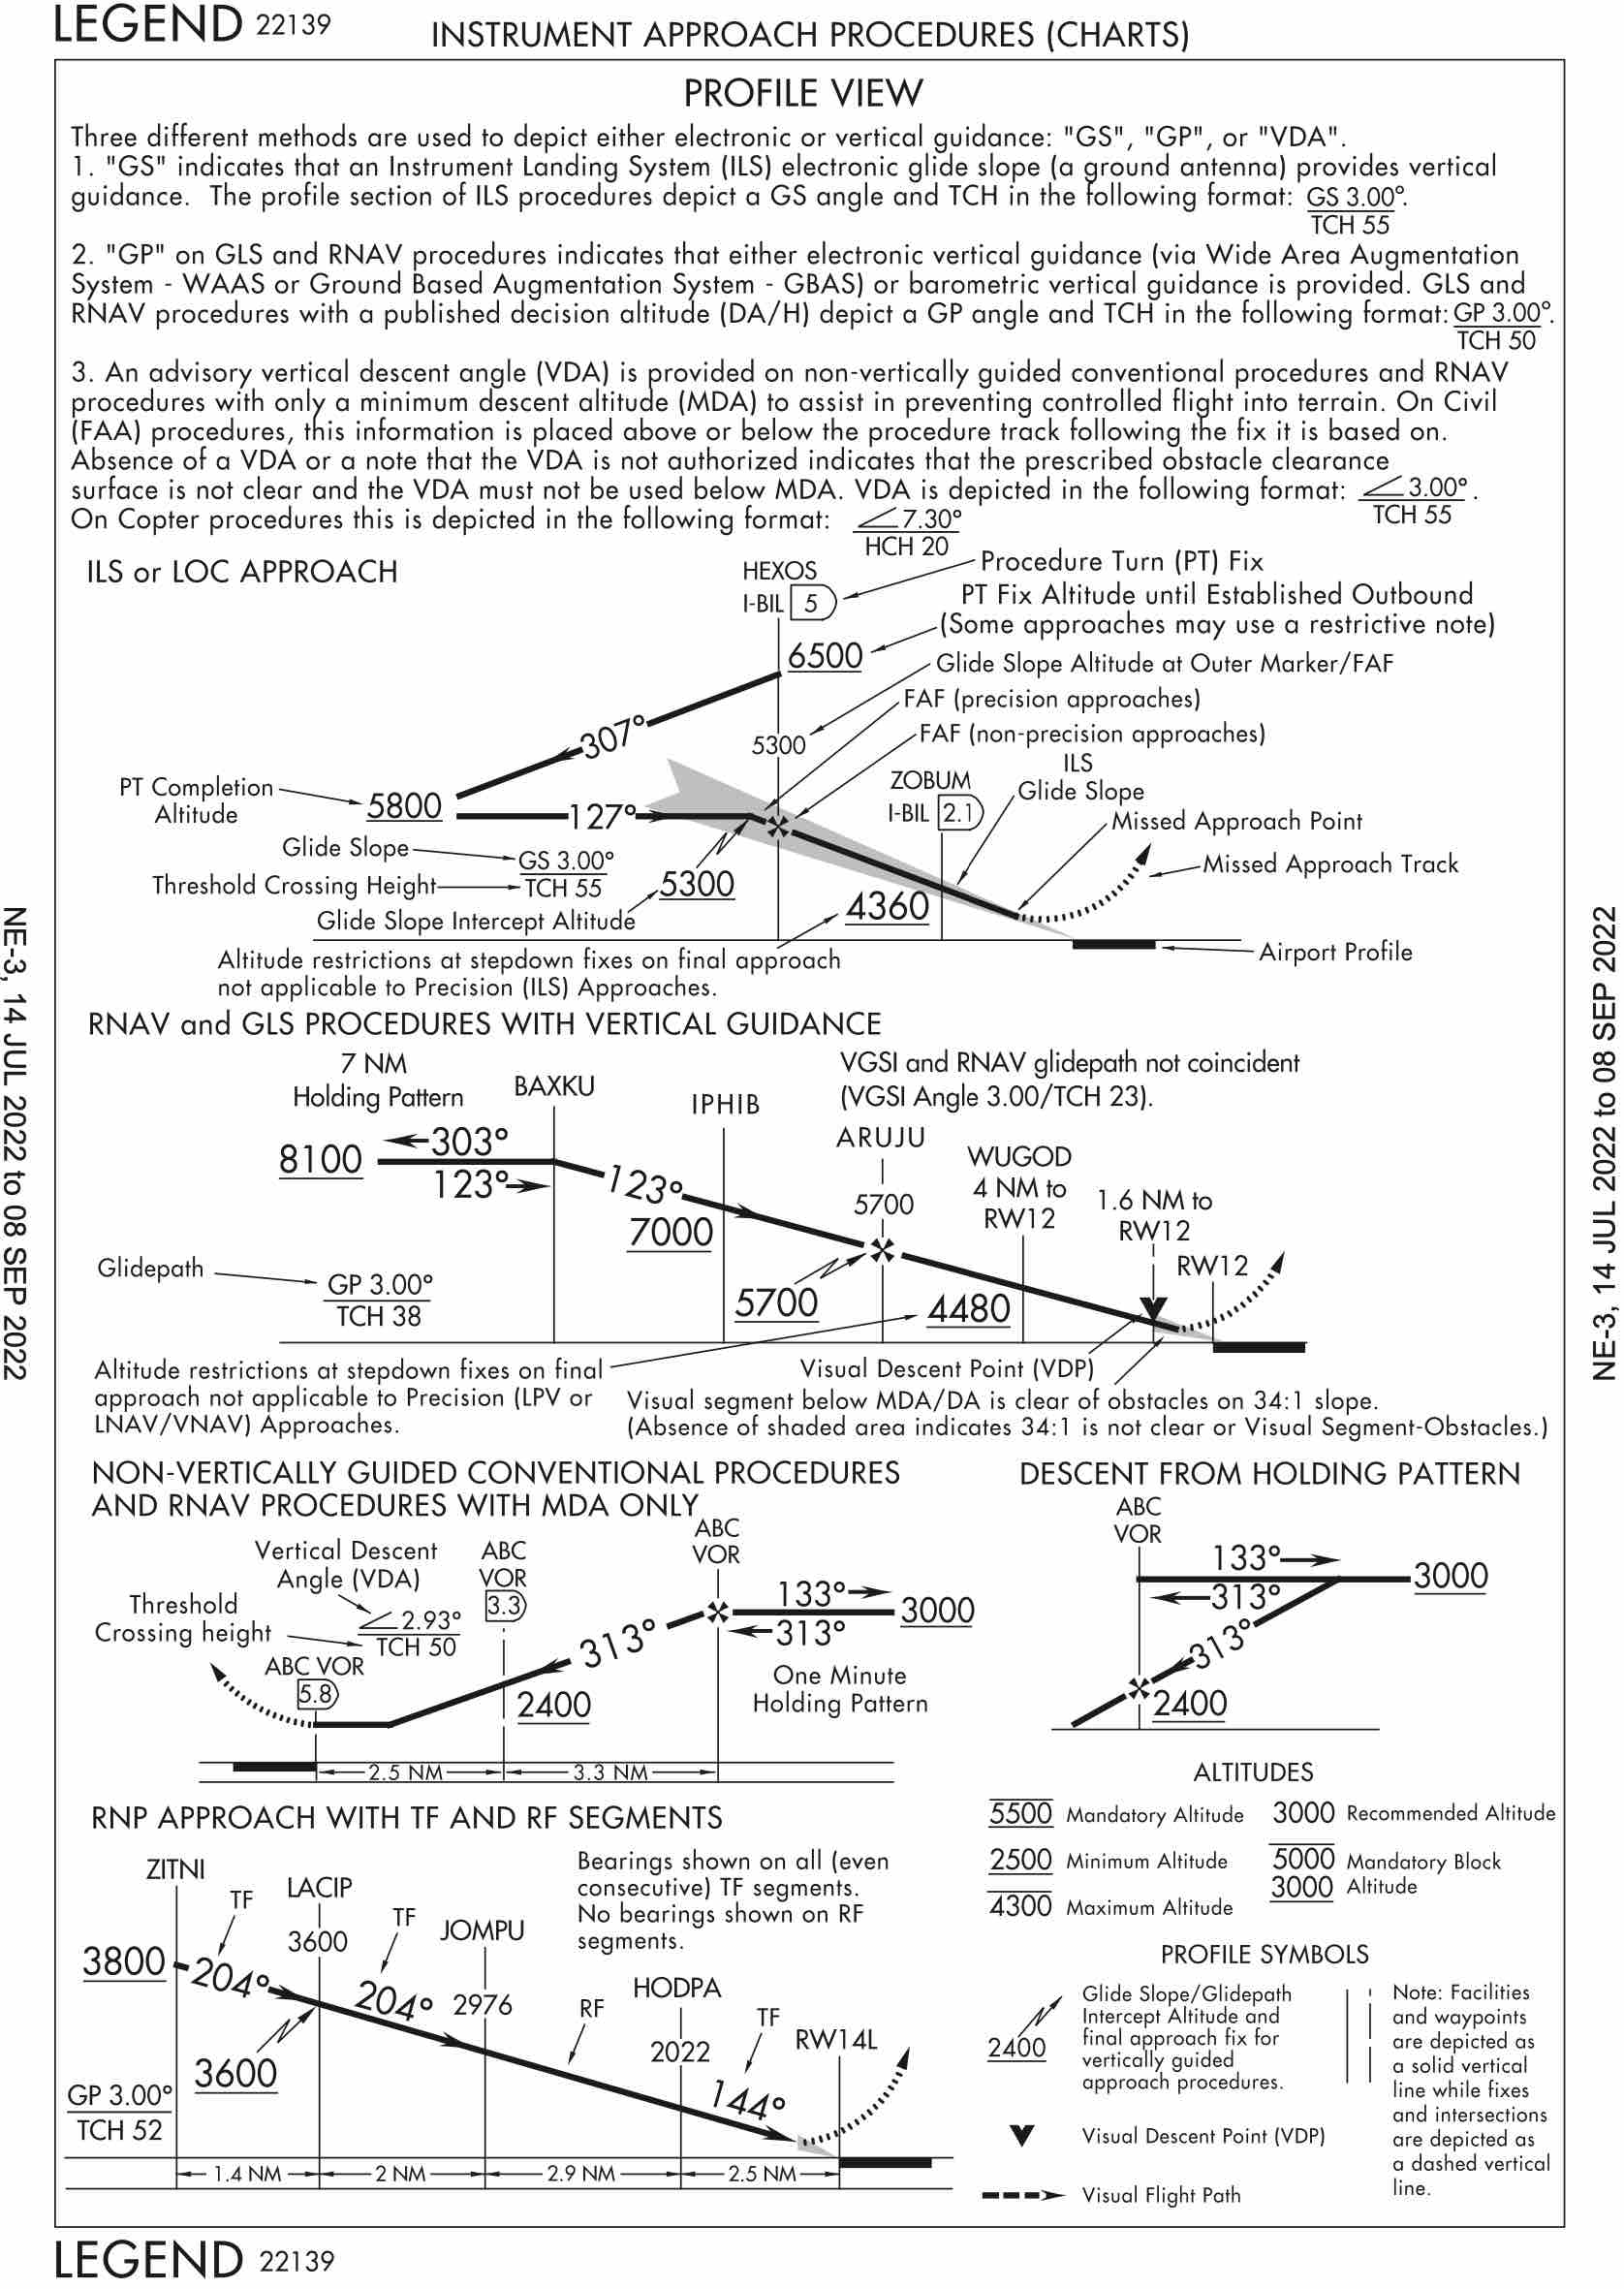
- Profile view
- Minimums
- Airport diagram
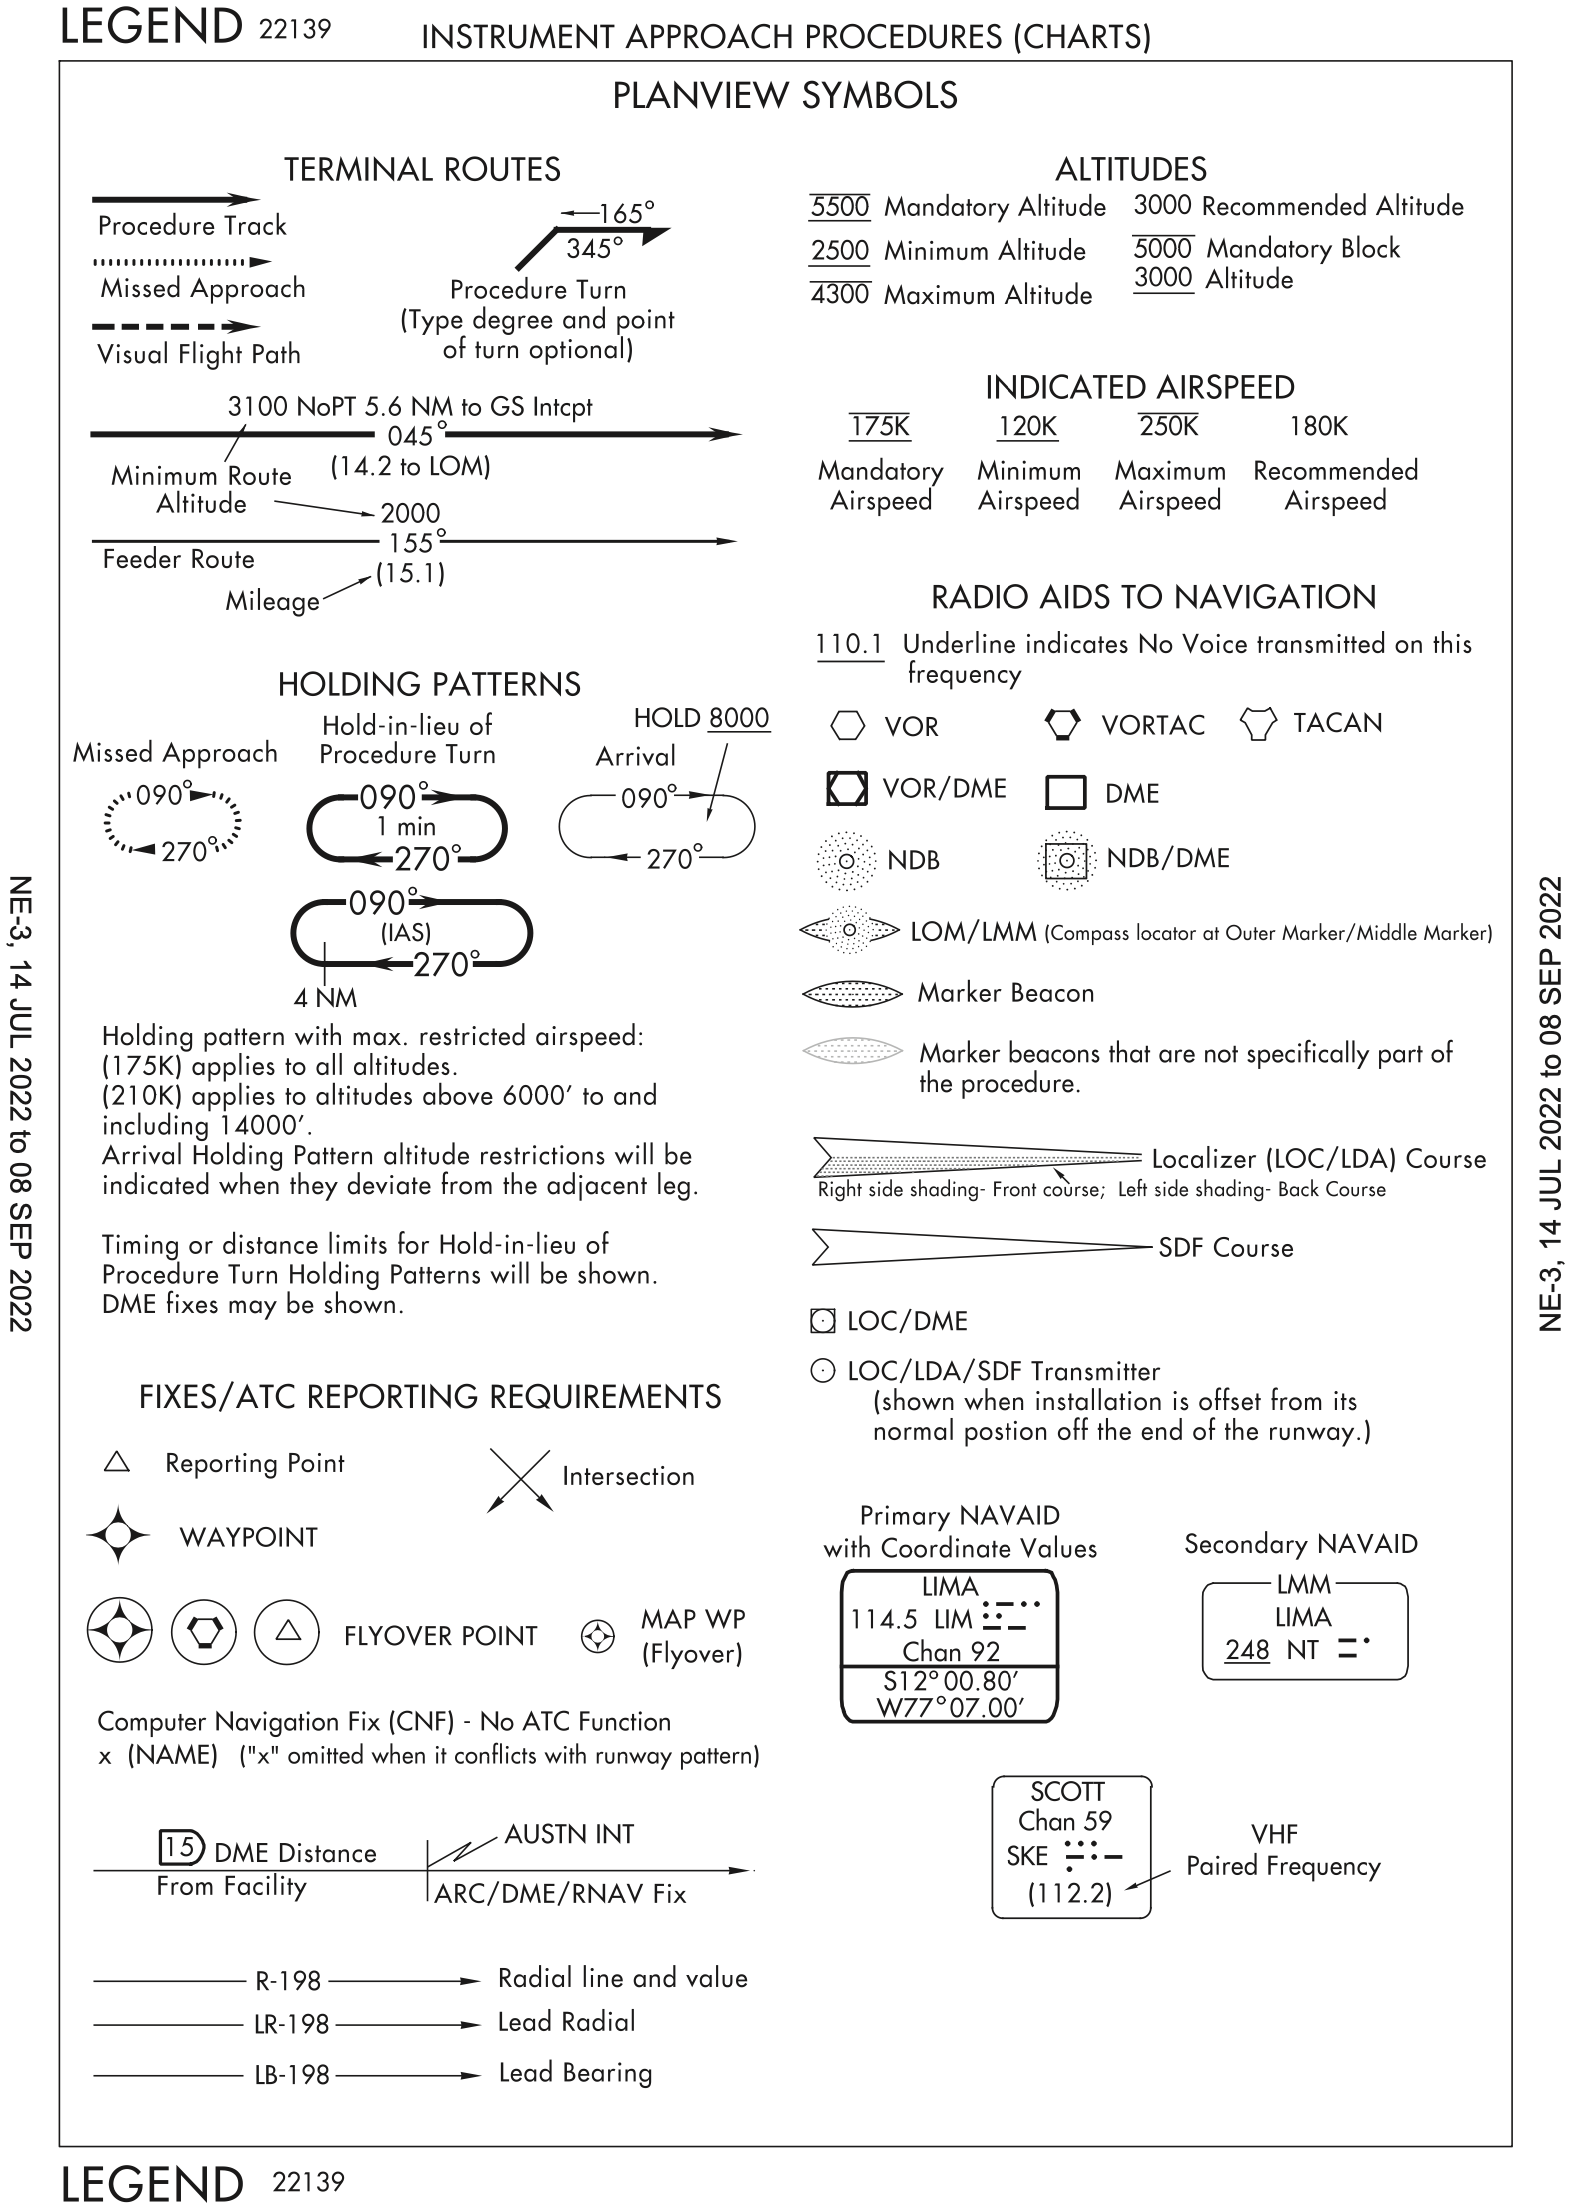
- The Digital Terminal Procedures Publication (d-TPP)/Airport Diagrams has the legend for instrument approach procedures.
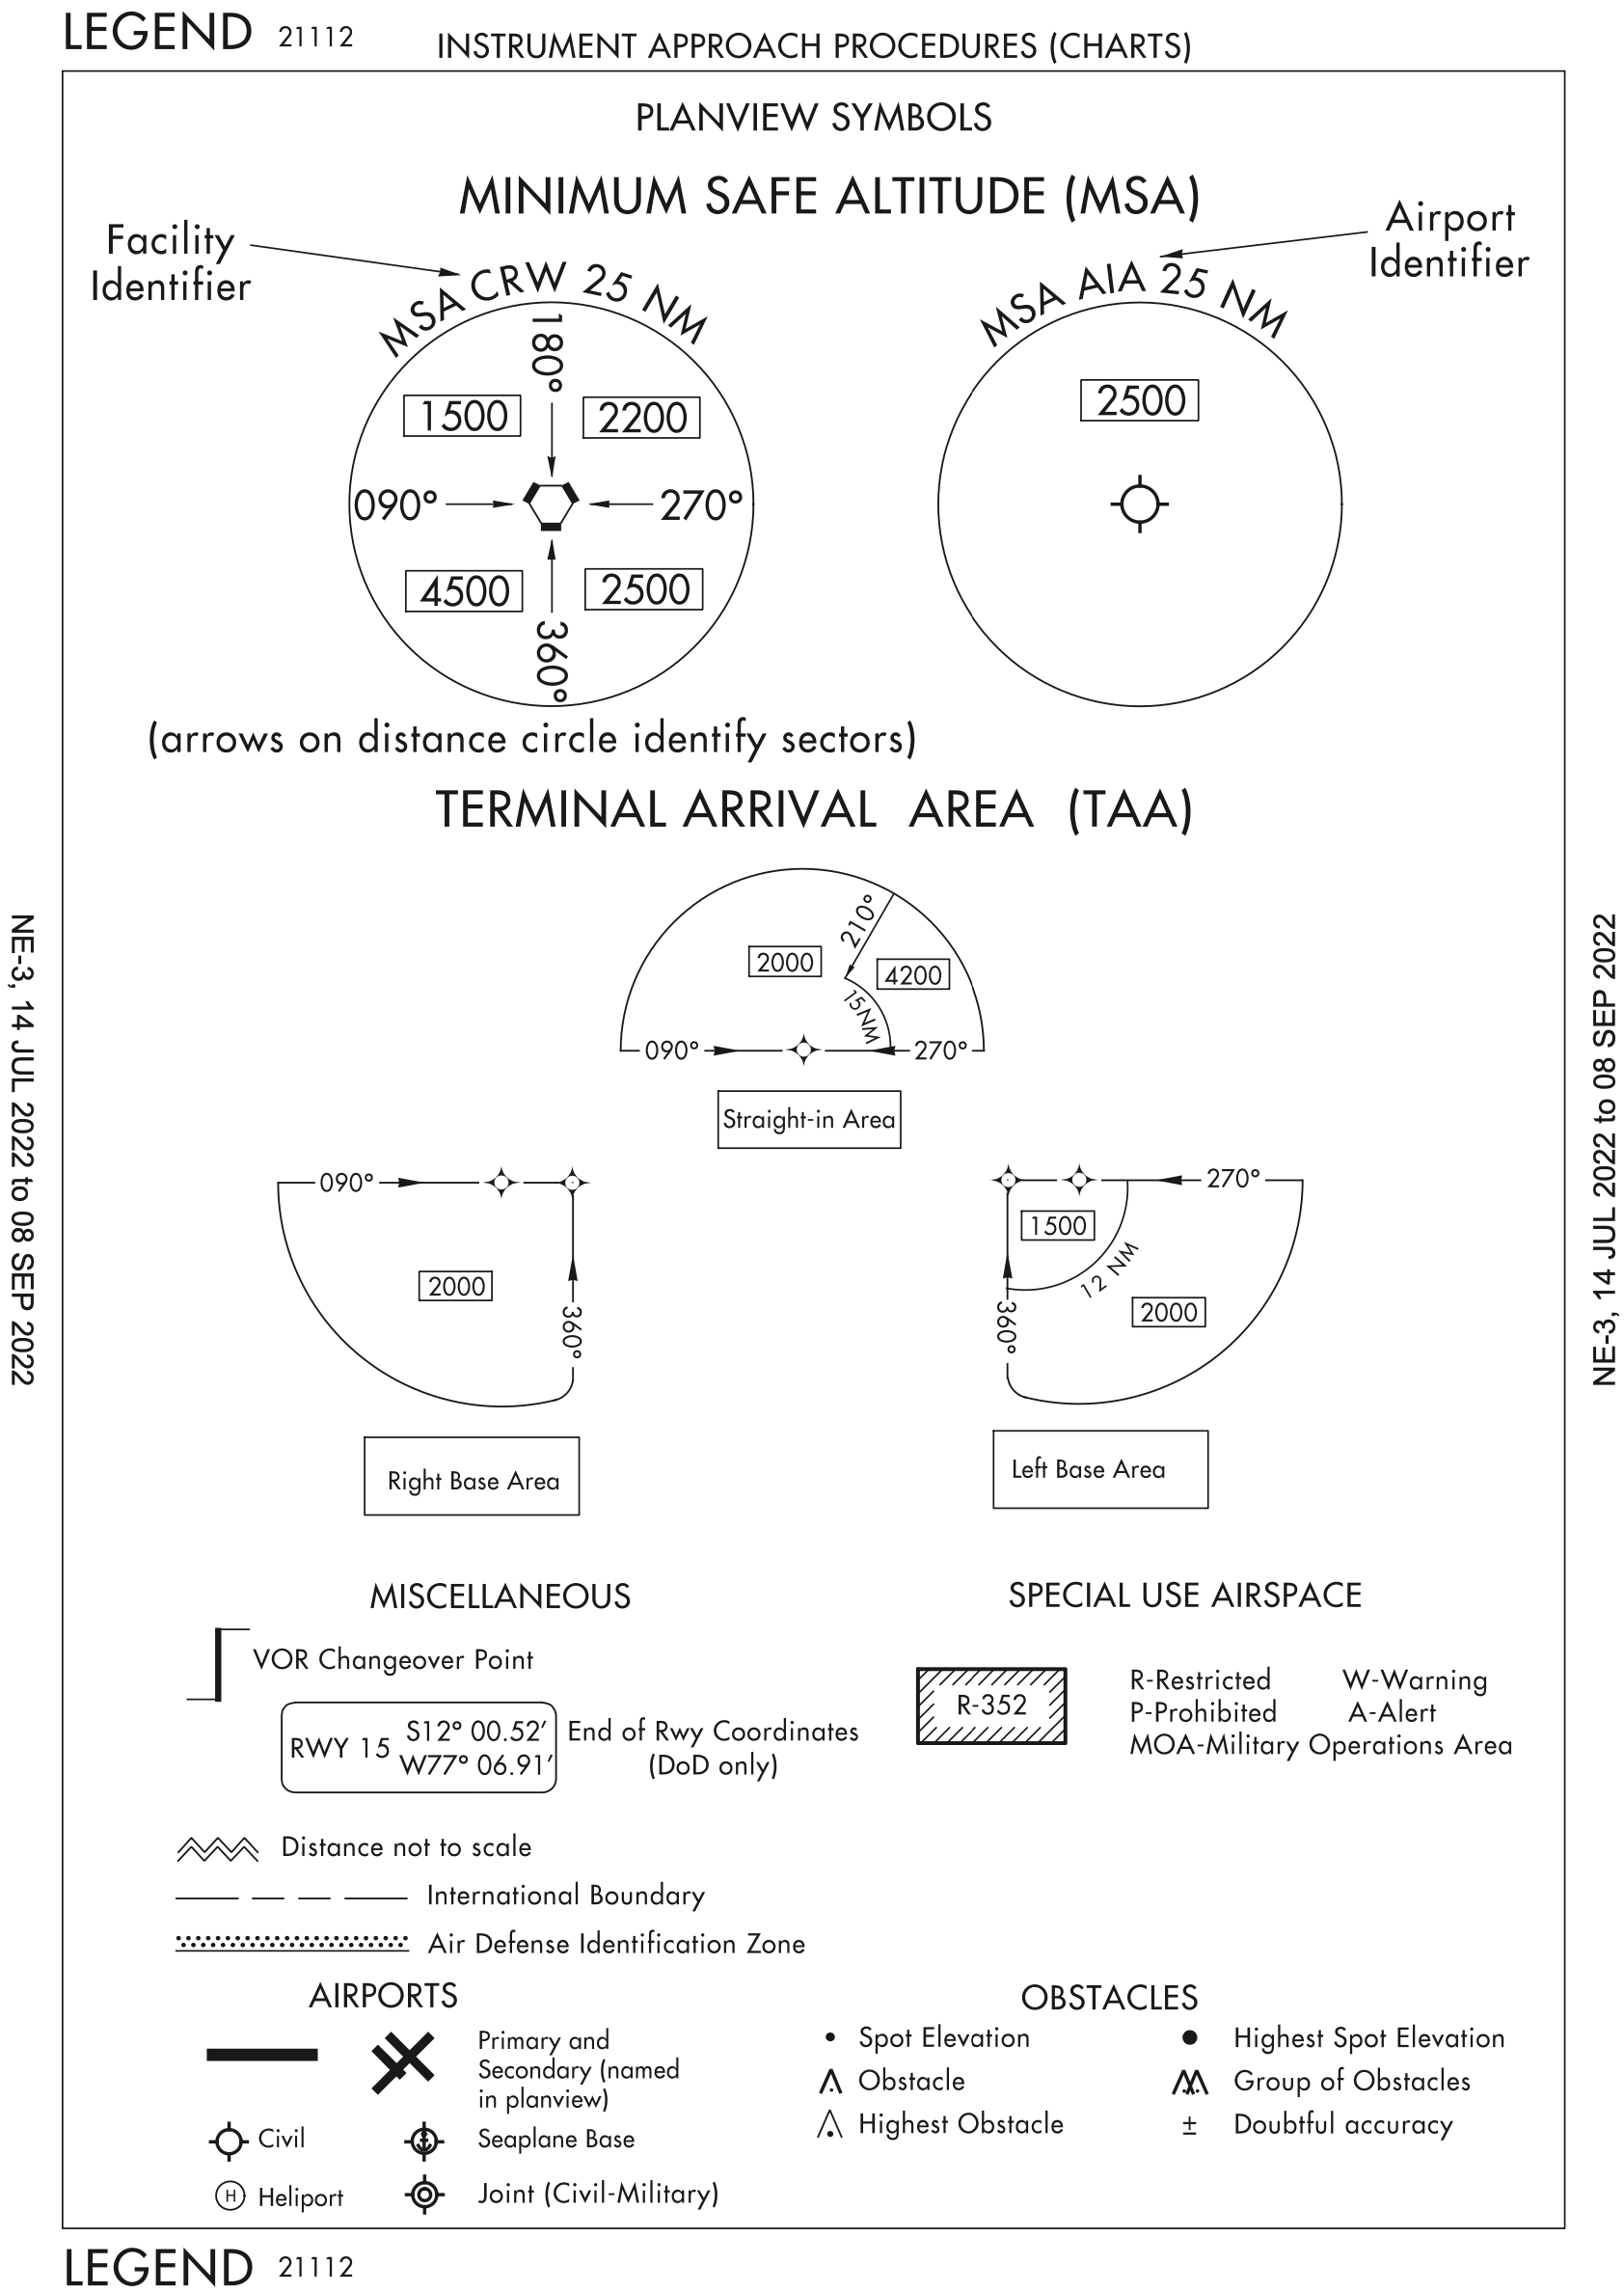
MSA and TAA
The Minimum Safe Altitudes (MSA) is published for emergency use on IAP or departure procedure (DP) graphic charts. MSAs provide 1,000 feet of clearance over all obstacles, but do not necessarily assure acceptable navigation signal coverage.
Altitudes published within the TAA replace the MSA altitude. However, unlike MSA altitudes the TAA altitudes are operationally usable altitudes. These altitudes provide at least 1,000 feet of obstacle clearance, more in mountainous areas.
Equipment Requirements
When radar or other equipment is required for procedure entry from the en route environment, a note will be charted in the planview of the approach procedure chart (e.g., RADAR REQUIRED or ADF REQUIRED). When radar or other equipment is required on portions of the procedure outside the final approach segment, including the missed approach, a note will be charted in the notes box of the pilot briefing portion of the approach chart (e.g., RADAR REQUIRED or DME REQUIRED).
Briefing the Approach
- There is no standard way to do an approach briefing
- Learn how to do a complete brief
- Depending on how low on the approach we are expecting to break out and go visual will dictate the level of depth of the approach brief
- How the Missed Approach Point (MAP) is determined must be part of briefing
- Precision: DA (Note: DA is the prefered term versus DH)
- If when shooting the approach we only see the approach lights, we can continue to descend to 100 feet above the TDZE
- That is why this is important to brief
- Tthe "identification" of some fixes on NPA which allows further stepdown
- Optional fixes - allow lower minima for aircraft that can identify them
- The WIRE checklist can be used to setup for an instrument approach
- W - Weather
- I - Instruments
- R - Radios
- E - Enroute briefing
- The ABC checklist is an alternative to the WIRE checklist for the same purpose
- A - ATIS
- B - Build + Brief
- C - Checklist
- Or alternatively:
- Listen
- Load
- Brief
- The enroute briefing is something like what's in How do you Brief an Approach Using FAA/NACO Charts although I have modified it slightly.
- Type of Approach & Location.
- Check the Date
- Navigation
- Final approach course.
- TDZE
- If you have the approach lights system at DA/MDA, you can continue to 100' above TDZE. 91.175(c)
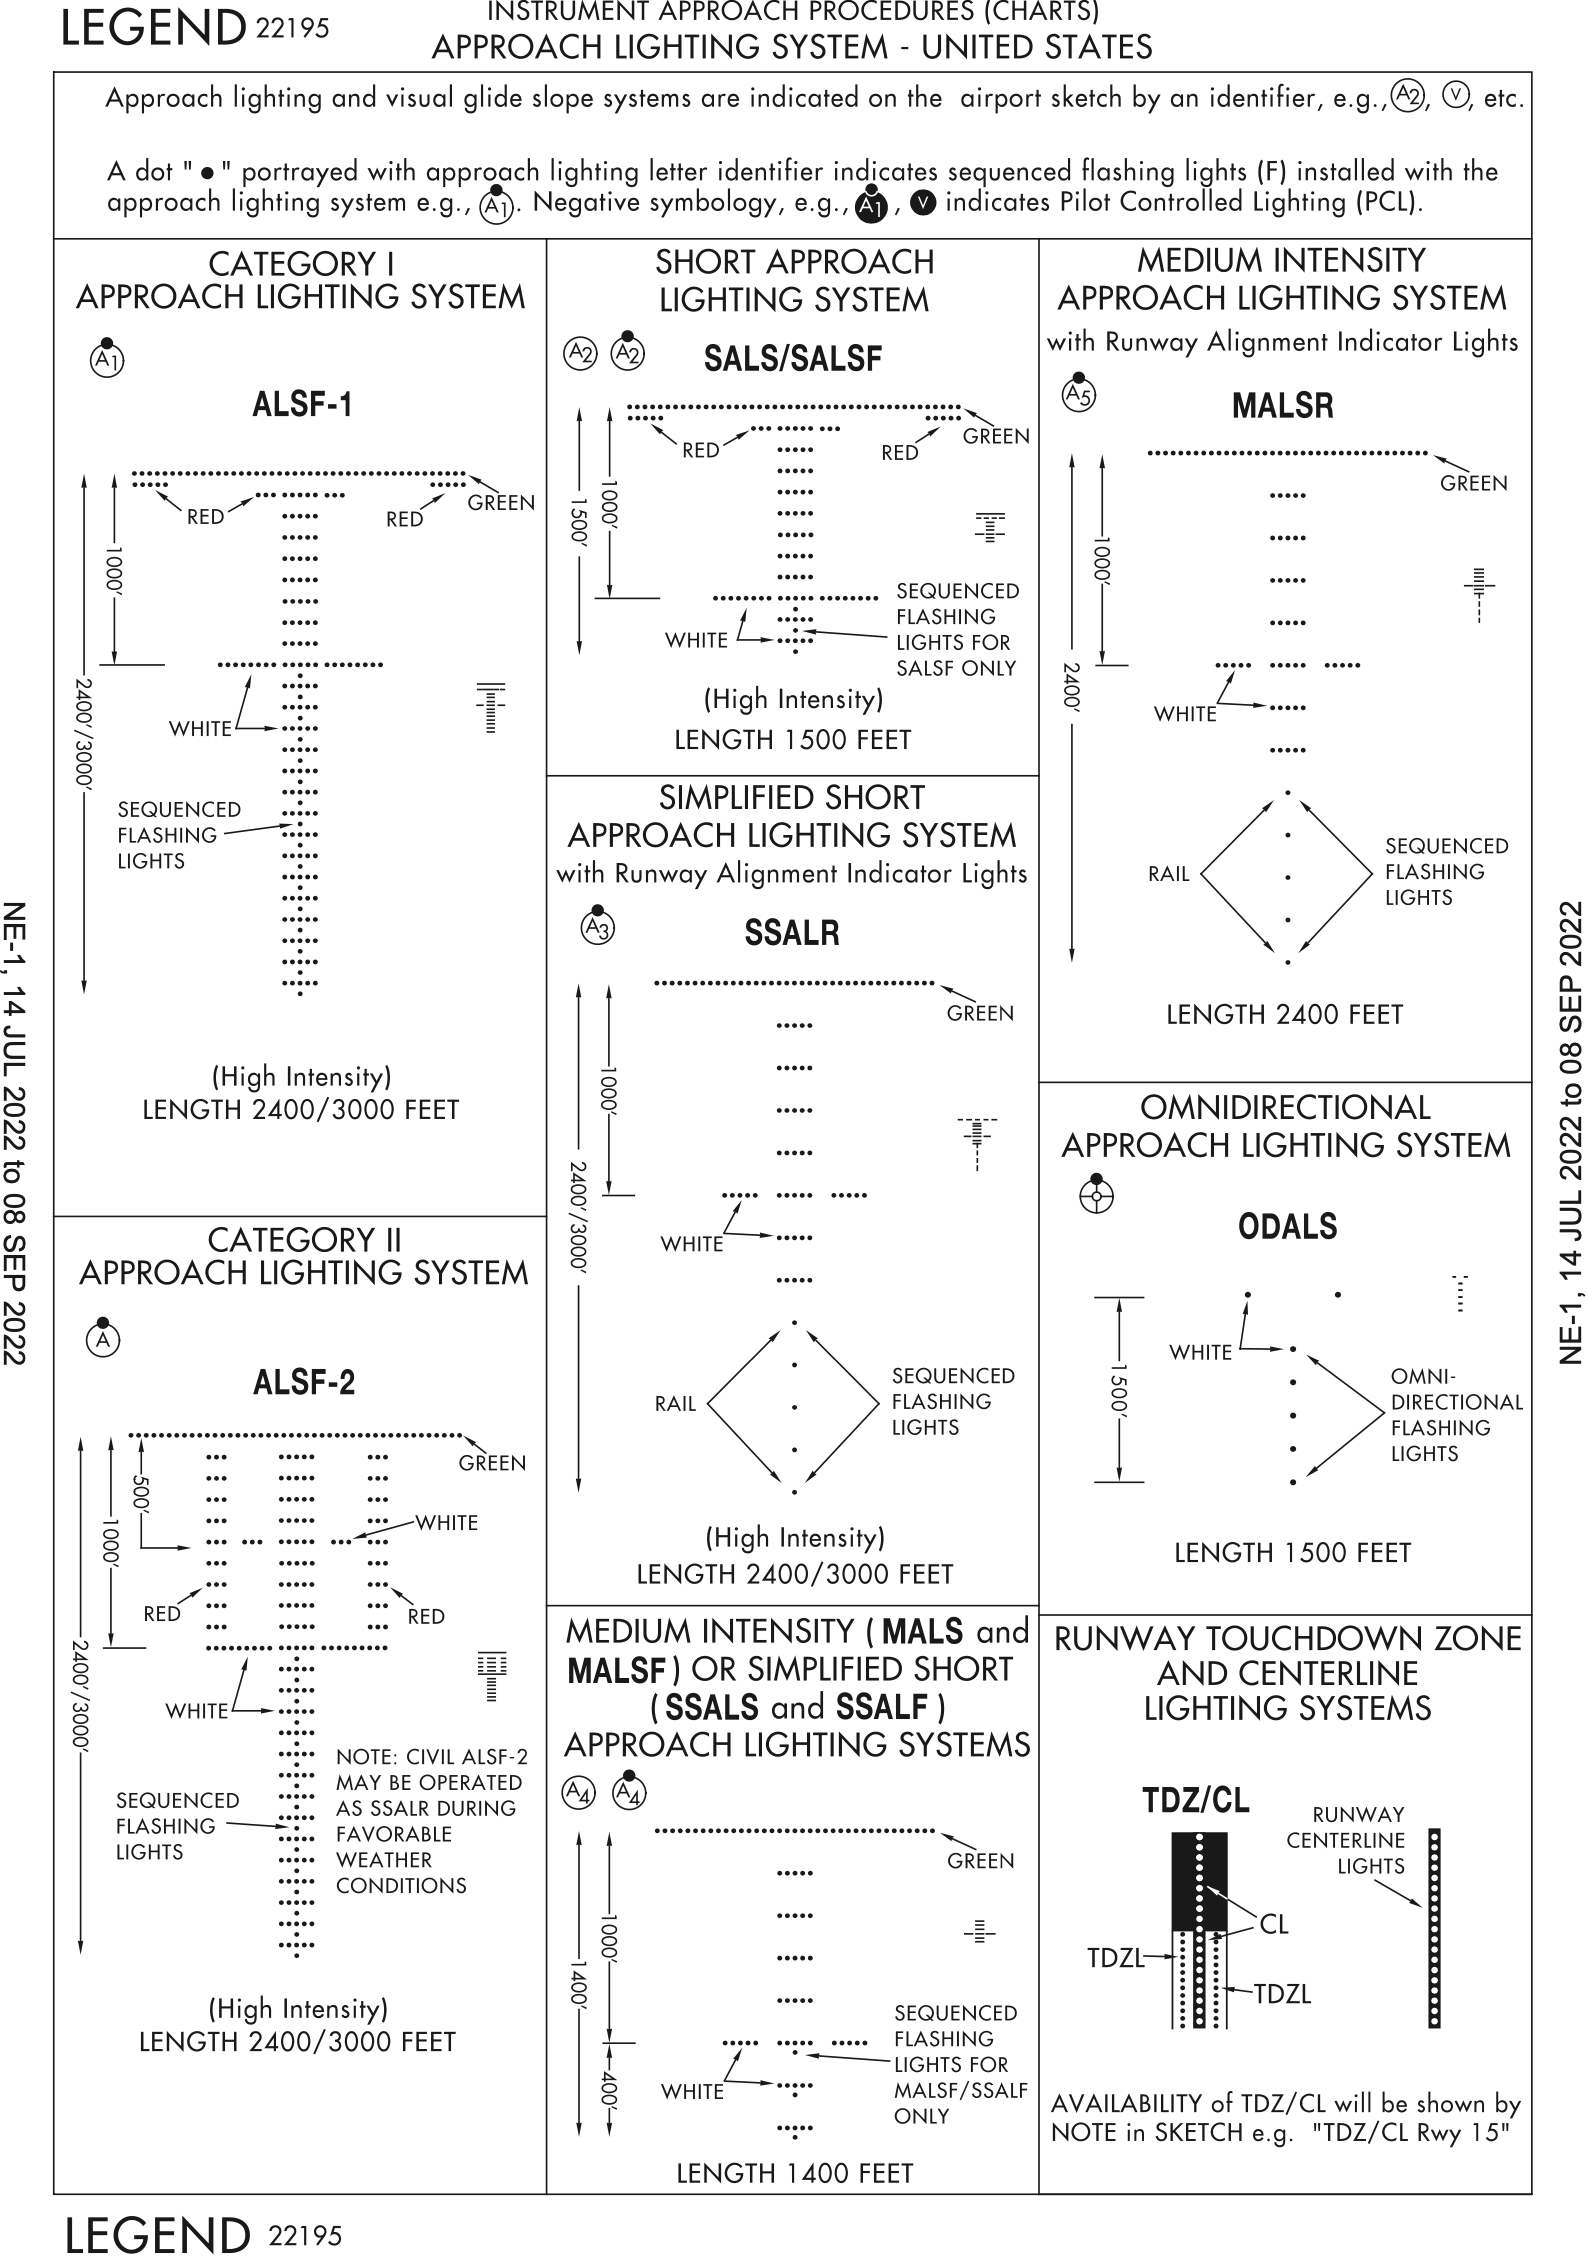
- Type of Lighting System
- Minimum Safe Altitudes (MSA) and terrain
- Glide slope crossing altitude (precision), or final approach fix location and altitude (non-Precision).
- Glide slope intercept altitudes
- Other frequencies required for the approach. Example, DME or VOR cross radials if GPS is not available.
- DA or MDA, and visibility requirements and current visibility
- Taxi plan after you land.
- Missed approach point, and the initial portions of the missed approach procedure (heading & altitude).
- Missed approach frequencies.
- "Any questions?" if flying with another pilot
Example Approach Briefing
- Run WIRE checklist
- Weather - get the ATIS
- Instruments
- Altimeter
- Localizer frequency, course
- Missed approach in standby
- Radios
- Set up comm 1/2 active/standby preparing for missed
- Comm 1 active: approach
- Comm 1 standby: tower
- Comm 2 active: ATIS
- Comm 2 standby: doesn't matter
- Set up comm 1/2 active/standby preparing for missed
- Enroute briefing
- Before enroute briefing
- Verify correct chart for given approach
- Verify chart expiration date
- Brief
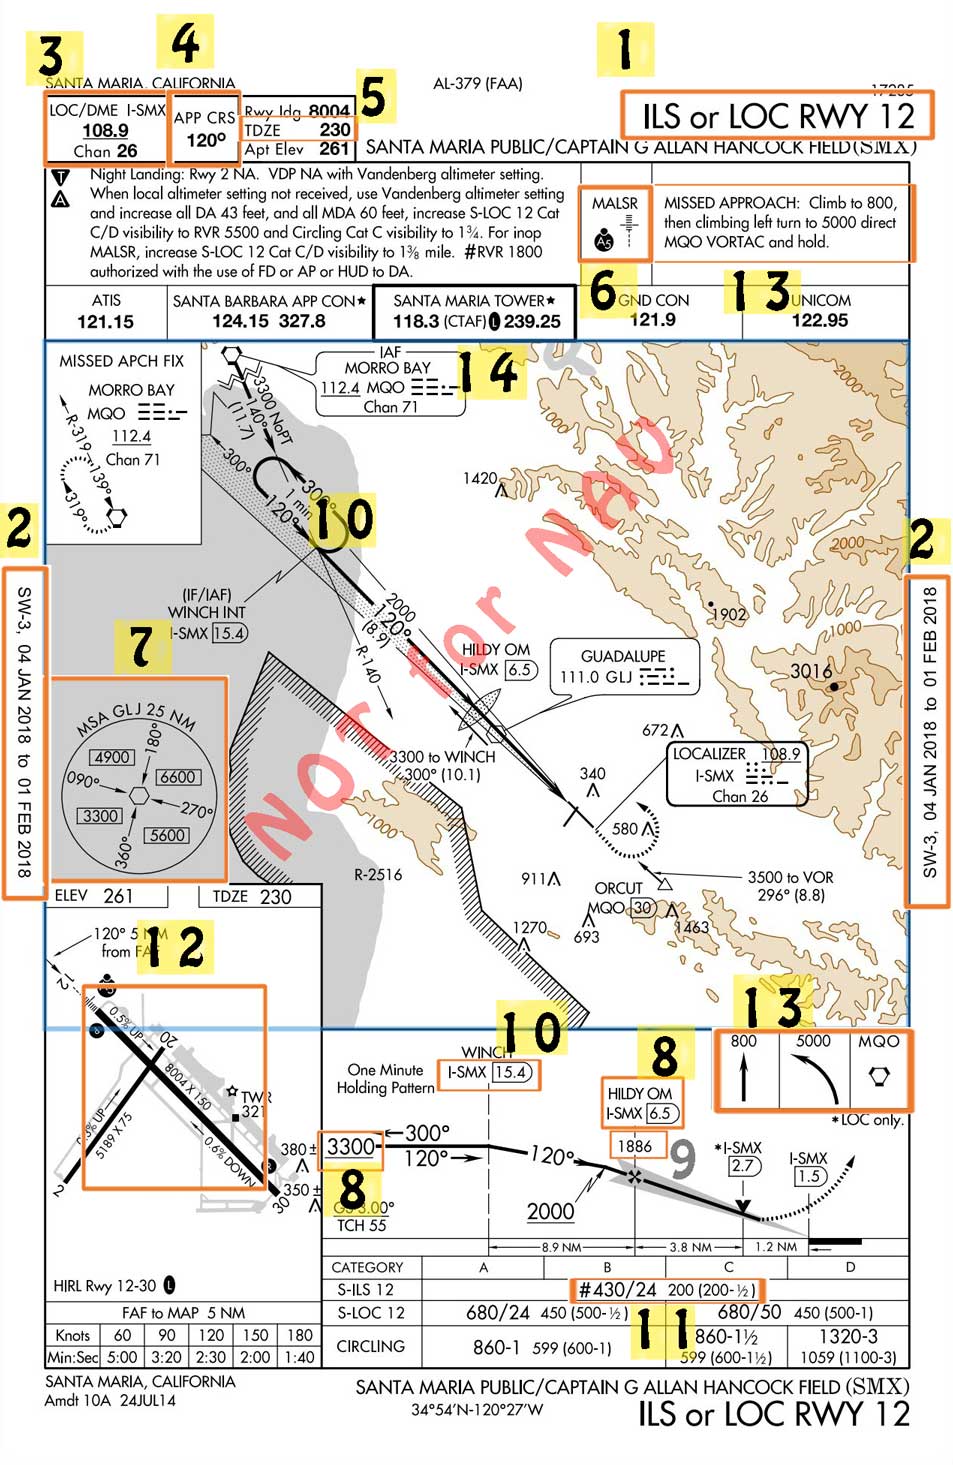
- We are doing the ILS 12 in Santa Maria.
- The chart dates are valid.
- We are currently (location relative to airport) at (altitude)
- Localizer frequency 108.9 set in nav 1 and 2 active AND identified
- Heading bug set to final approach course 120
- Touch down zone elevation TDZE is 230 feet with 8004 ft runway
- Approach light system is a MALSR, with PAPI on the right.
- Minimum Safe Altitude (MSA), 3300' from the quadrant we are approaching.
- WINCH at or above 3300' and Final Approach-HILDY 1886'.
- DME source is from the localizer frequency. We need MQO (No GPS) to identify WINCH on R-140 from MQO.
- Decision Altitude, 430'.
- If we have the approach lighting system in sight, we can descend to 330' (100' above TDZE).
- We need 1/2 sm, we have 1sm visibility.
- When we land, we can plan for a left turn on A5, right on A, and left at the FBO (look at the airport diagram).
- If we have to go missed approach, climb runway heading to 800'. Then a climbing left turn, direct Morro Bay, and hold. We are going to be doing a parallel entry.
Procedure Turns
- See FAA-H-8083-15B Instrument Flying Handbook
- Page 1-20
- Page7-30
- Common on VOR approaches
- 200 KIAS speed limit
- Remain within 10 nm
- Turn in the direction of the barb
- Give yourself enough room to descend
- Not authorized if
NoPTon approach plate - The absence of the procedure turn barbed arrow in the plan view indicates that a procedure turn is not authorized for that procedure
- From before the days of GPS and DME where often VOR were the IAF, and pilots flying for long distances between VORs arriving at the IAF could do the procedure turn to buy a bit of time
- With GPS we have distance so no need for procedure turns
- Controllers prefer to give vectors to make things faster
- If we want the procedure turn need to ask ATC for it
- When must a procedure turn be flown
- Always except
- When it says
NoPT - If you are getting vectors to the final approach course
- If it is a timed approach from a holding fix
- By pilot or controller agreement
- If ATC says, for example, cleared for the straight-in ILS 32 at KOKV
- When it says
- "Straight-in" has two meanings
- One is the alignment of final approach course with runway
- The other, in context of procedure turns, is where a procedure turn is not used
- 14 CFR §91.175(j)
- AIM 5-4-9 Procedure Turn and Hold-in-lieu of Procedure Turn
- The same is true for a hold-in-lieu of procedure turn
- If charted it must be flown, unless one of the above exceptions is met
- Always except
- Procedure turn usually needs to be completed within 10 nm
- In Cessna, go out about 8 miles and then turn out for 1 minute
- When getting vectored should be at least 2 nm or more from FAF
- This is from ATC handbook
- In 172 we teach to fly the approach at 80 knots (so Cat A)
- One good reason for this is it keeps us 5 knots below our flap speed
- Do not fly a procedure turn when SHARP TT
- S - Straight-in approach clearance
- H - Holding in lieu of a procedure turn
- A - DME Arc
- R - Radar vectors to final
- P - No PT depicted on chart
- T - Timed approach from a hold fix
- T - Teardrop course reversal
- Airliner approaches are 120 - 130 knots
- Smaller jets approach at 110 - 120 knots
- So in a 172 we can fly the approach at 120 knots and we'll fit in with most other traffic
Initiating an Approach
Minimums do not preclude flights under Part 91 from initiating an approach
- You can "take a look"
- 121 and 135 operators must have weather at or above minimums as reported on ATIS/AWOS in order to even begin the approach
Standard instrument approach procedures (SIAP) must begin at an initial approach fix (IAF) or an intermediate fix (IF) if there is not an IAF.
Continuing the Approach / Descending Below MDA or DA
- See 14 CFR §91.175(c) Operation below DA/DH or MDA
- DA, as name implies, is altitude at which a decision must be made
- Descent below DA is allowed when going missed due to downward momentum
- Up to about 40 feet below DA is acceptable
- Three requirements to descend below DA or MDA
- Flight visibility
- Flight visibility must be observed to be above minimums
- This is the visibility on the approach plate, and we as the pilots determine if that is met
- Different from reported visibility
- Note approach lights, runway markings, runway length as a gauge for flight visibility
- Approach light systems are usually 2,400 - 3,000 ft.
- TDZ markings are 500 ft. apart for a total of 3,000 ft.
- Runway lights are 200 ft. apart
- Amber lights indicate 2,000 ft. or 1/2 runway remaining
- Runway environment in sight
- Be able to distinctly identify one of the following visual references (ATRVTR)
- A - Approach lights
- Approach lights alone only allow descent to 100 ft. above TDZE
- From that point must be able to see any other parts of the runway environment to continue to descend and land
- T - Threshold
- Markings
- Lights
- R - REILS
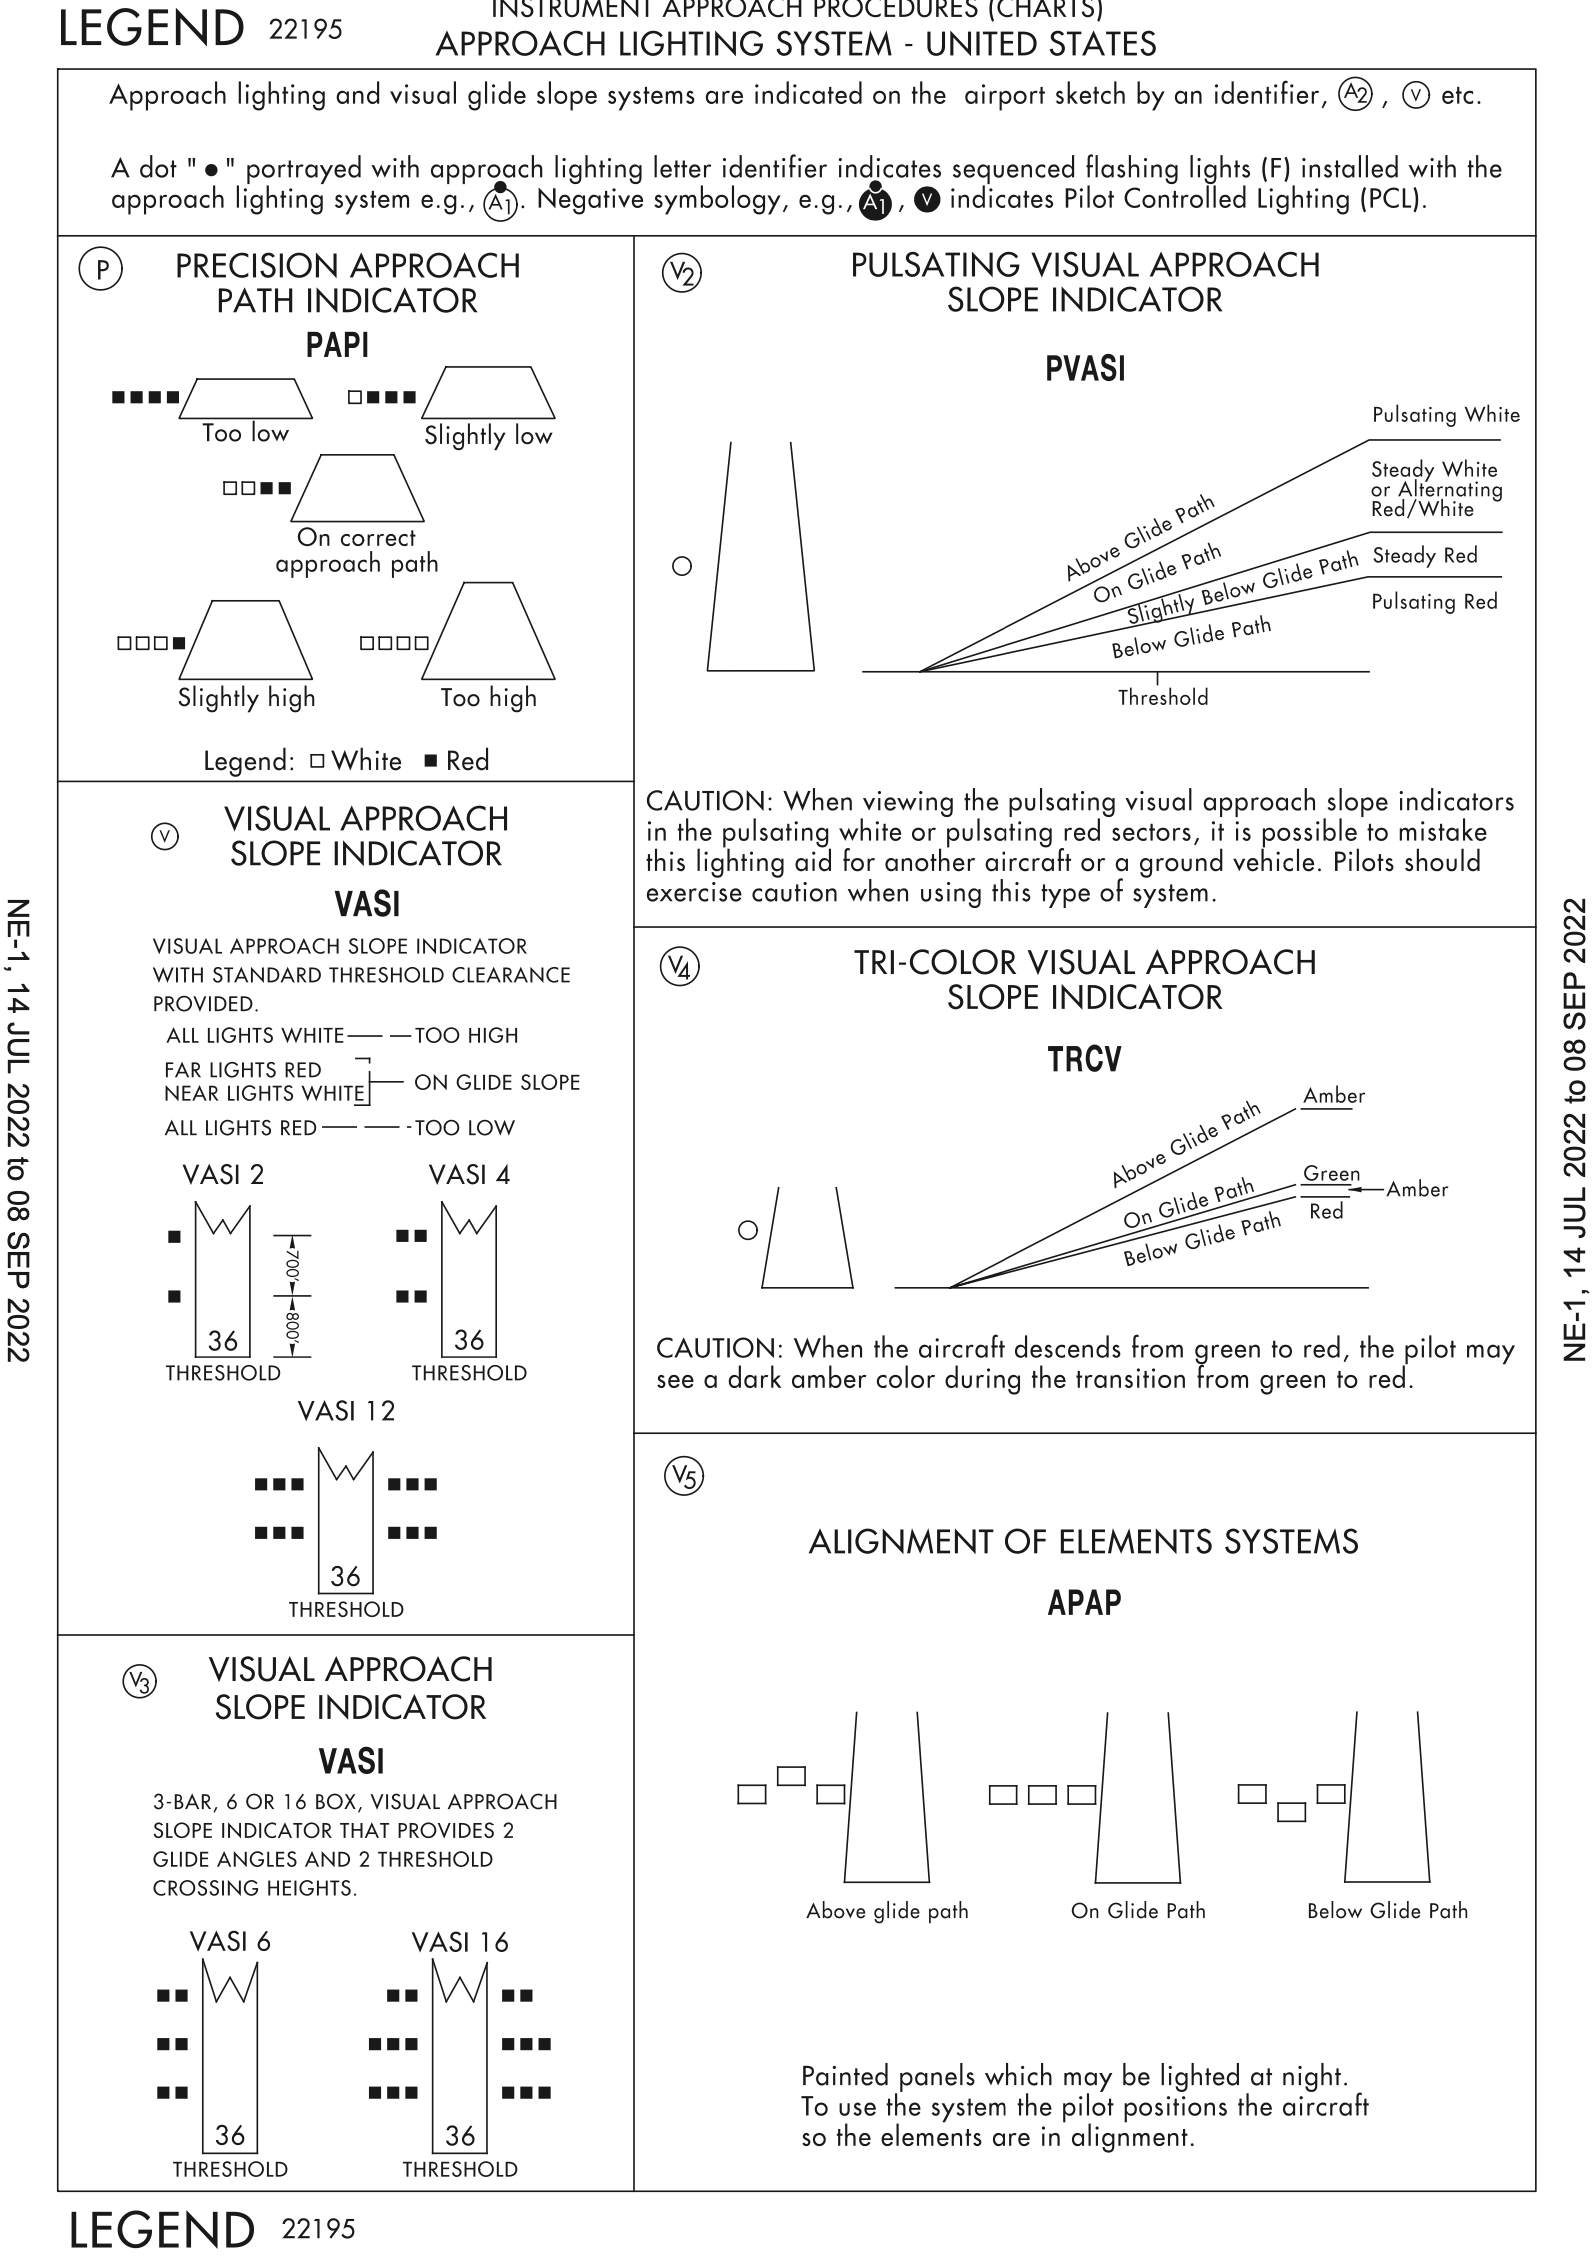
- V - VASI (or PAPI)
- T - Touchdown
- Lights
- Zone
- Markings
- R - Runway
- Lights
- Markings
- Normal maneuvers (stabilized approach)
- No official definition
- For us, no more than a forward slip
- Want to get the airplane on the ground in first 1/3 of runway
- Flight visibility
- Learn length of MALSR/ALS etc.
- Know types of lighting or where to find them
- If we don't have the flight visibility required by the approach, are not supposed to land
- This can be because of low-lying radiation fog, for example
- So if you arrive at MAP and can see any of the above, can descend and land
- When briefing the approach, note the type of approach lights, location of VASI/PAPI, and build in your mind a picture of what you need to see in order to have the required flight visibility
- In crewed operation (with pilot flying and pilot monitoring)
- "lights" - called out by PM to indicate lights are in sight
- "continuing" - called out by PF to indicate they will descend to 100 feet above TDZE
- "runway" - called out by PM to indicate runway is in sight
- "landing" - called out by PF to indicate they will land
- Pre-make decisions
- Plan of action
- Ask ATC where people are going and getting in successfully
Canceling IFR
- Good idea to do as soon as you can safely make it to airport under VMC
- This frees up the runway for use by other traffic more quickly
- Locks up runway for 30 minutes or until they locate you